Course: Software Security (KOSEN69) · Week 1 Aligned to: OWASP 2025 A06 Insecure Design · CWE-501 (Trust Boundary Violation) Signature game: "Elevation of Privilege" (Microsoft STRIDE card deck)
Ethics note: This week is modeling only — you analyze design, you do not attack the app. Run the sample app only on your own laptop — it listens on
localhostonly, so nobody else on the classroom network can reach it. Never apply these techniques to systems you do not own or lack written permission to test.
Part 1 — Student Information
| Name | Student ID | Date | Group | AI tools used |
|---|---|---|---|---|
AI tools used: every AI tool you used this week and what for (e.g. "ChatGPT — explained STRIDE"), or "none". Using AI is allowed when you disclose it; Audit the AI below builds on this entry.
Part 2 — Lecture Questions
Answer in your own words (2–4 sentences each).
- Define the CIA triad and give one concrete failure example for each of the three properties.
- What is a trust boundary, and why does data crossing one deserve extra scrutiny?
- Explain "attack surface." Name two things that increase it in a web app.
- What does each STRIDE letter map to, and which security property does each threat violate?
- What does "Secure by Design" (CISA) mean, and how does it differ from bolting security on after release?
Part 3 — Hands-on Lab (125 min in class + 95 min homework)
In class or homework. Tasks marked in class are done during the lab, where the instructor checks your evidence and reasoning. Tasks marked homework are finished after class and submitted with the rest of this worksheet, before the next class. Every task keeps its time and its marks. Answer Part 2 before class, from this week's slides; Part 4, Audit the AI and Comprehension & Prompt are homework. In class (125 min): Tasks 0, 1, 2, 3, 3b and 4 · Homework (95 min): Tasks 5, 6, 7 and 8
Learning goals: build a data-flow diagram (DFD), apply STRIDE to a real Flask app, rank risks, and propose mitigations. Prerequisites: Docker Desktop (or Docker Engine + Compose) on your laptop; on Windows, Git for Windows (for Git Bash) or WSL; a drawing tool (draw.io / paper + photo); the Elevation of Privilege deck (print or virtual) — free print-and-play PDF at github.com/adamshostack/eop.
Environment setup
Windows: run every command in this worksheet — including the identity stamp under Evidence & Integrity — in Git Bash (installed with Git for Windows) or a WSL terminal. PowerShell and cmd handle
curl, the\line breaks, the quoting andprintfdifferently, so the commands below will not run there as written.
cd labs/week01-threat-modeling
docker compose up --build           # starts sample-app on http://localhost:8080 — leave it running, use a 2nd terminal below
curl -s -X POST localhost:8080/notes -H 'Content-Type: application/json' \
     -d '{"owner":"alice","body":"hello"}'   # observe behavior, do not attack
curl -s localhost:8080/notes

echo "demo file" > demo.txt
curl -s -X POST localhost:8080/upload -F "file=@demo.txt"   # observe behavior, do not attack
curl -s localhost:8080/files/demo.txt
Source to model lives in sample-app/app.py. Template to fill: THREAT-MODEL-TEMPLATE.md (copy it, do not edit the original).
What to submit per task: the threat/element identified + a screenshot (DFD, table, or running app) + a 2–3 sentence mitigation.
Task 0 — Onboarding (5 min, in class) · Goal: prove the environment works. Steps: docker compose up, hit /notes and /files/<name>, read sample-app/app.py. Opening http://localhost:8080/ itself gives 404 Not Found — that is expected: the app has no home page, only /notes, /upload and /files/<name>. /files/<name> also returns 404 until you have uploaded a file with that name. Deliverable: screenshot of the running app + the JSON response.
Task 1 — Draw the DFD (25 min, in class) · Goal: map the system. Steps: identify the external entity (web client), the process (Flask app), the data store (notes.db SQLite), the uploads/ store, and the flows for /notes, /upload, /files/<name>; mark the Internet→app trust boundary with a dashed line. Deliverable: DFD image embedded in your copy of the template.
Task 2 — STRIDE the elements (30 min, in class) · Goal: enumerate threats per element. Steps: for each element fill the S/T/R/I/D/E grid. Ground it in real code: /notes accepts a client-supplied owner with no auth (Spoofing) and returns every user's notes to anyone who asks (Information disclosure); /upload saves raw f.filename — arbitrary-file-write (Tampering) — and echoes that client-supplied filename back unchanged, ../ included; /files/<name> reads it back but is comparatively defended (see Task 5); no logging anywhere (Repudiation). Deliverable: completed STRIDE table.
Task 3 — Elevation of Privilege game (20 min, in class) · Goal: find threats you missed. Steps: play the EoP deck against your DFD; each card you can tie to a real element/flow scores a point; record every valid threat. No printer or scissors? Draw from the digital deck below instead — same 78 cards, same rule. Deliverable: list of carded threats + score.
Task 3b — Systems-level pass (25 min, in class) 🔭 · Goal: find what the per-element grid cannot see. Tasks 2 and 3 enumerate threats one element at a time, and that is exactly where threat models are known to stop short — students taught STRIDE alone reliably identify component threats and discount system-level ones (Joshi et al., ASEE 2024). So do a second pass over the whole diagram: 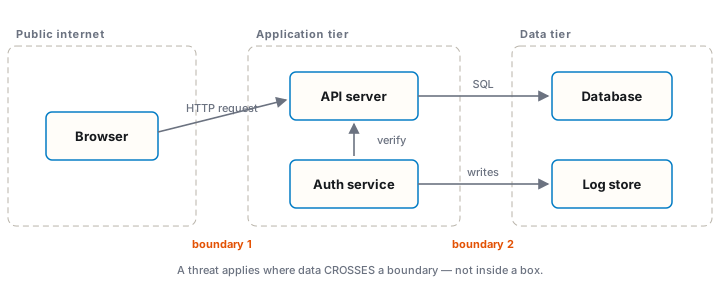
- Trust boundaries end-to-end. Follow one request from the client to
notes.dband back. List every boundary it crosses. Which crossing has no check on it? - Assume one element is fully owned. Pick the Flask process, then the
uploads/store. For each: what does the attacker now reach — not what is it, but where does it get them? - Chain two "low" findings. Find two threats you or the EoP deck rated minor that combine into something you would not accept. Write the chain as
A → B → consequence. - One-line system claim. Finish: "Even if every element-level mitigation in Task 8 is implemented, this system still fails if ___."
Use the simulation below before you start — toggle a component to attacker-controlled and watch what it reaches:
Deliverable: the boundary list, two owned-element reachability notes, one written chain, and the system claim.
Task 4 — Abuse cases & attacker personas (20 min, in class) · Goal: think like specific adversaries. Steps: define 2 personas (e.g. a curious logged-in user; an anonymous internet attacker) and write 2 abuse cases each against the sample app, tied to DFD elements. Deliverable: 4 abuse cases.
Task 5 — Path-traversal deep-dive (25 min, homework) · Goal: analyze the riskiest flow. Steps: trace /upload → /files/<name>; explain how ../ in a filename escapes uploads/; sketch the secure design (secure_filename, store outside web root, allow-list extensions). Deliverable: the data flow + secure-design note.
Task 6 — Threat-model the project target (30 min, homework) · Goal: kick off your term project. Steps: stop the sample-app first (docker compose down — both apps bind host port 8080), then run NoteVault (cd ../../project/starter-app && export TEAM_ID=<your-student-ID> && docker compose up), draw a quick DFD, and list the top 3 STRIDE threats you'd investigate. Deliverable: NoteVault DFD + top-3 threats (reuse these in your project report — project/REPORT-TEMPLATE.md in the repo root). Why TEAM_ID: it seeds a marker into your copy of NoteVault that makes your evidence traceable to you (see project/starter-app/README.md). Teams are not formed yet, so use your own student ID for now and switch to your team name once teams form.
Task 7 — Security requirements (15 min, homework) · Goal: turn threats into testable requirements. Steps: write 3 security requirements as acceptance criteria ("the system must … so that …"), each mapped to a threat from Task 2 or Task 6. Deliverable: 3 testable security requirements.
Task 8 — Defend / fix it: rank & mitigate (25 min, homework) 🛡️ · Goal: turn threats into action you can prove. Steps: rank the top 5 threats by likelihood × impact; propose one concrete mitigation each (e.g., auth on /notes, secure_filename() + allowlist for /upload, request logging for Repudiation, size/rate limits for DoS). Then pick one and actually implement it in your fork.
Deliverable — the top-5 table, plus for the one you implemented:
- the diff — the commit link (or hash) on your fork's
wk01branch. Push the branch to your fork and paste the link in this worksheet; do not open a pull request (a PR from your fork lands on the public course repo), - evidence it works: the request that succeeded before your change and is refused after — both outputs,
- why it closes the class, not the instance (2–3 sentences).
secure_filename()on one endpoint is an instance fix; "no user-supplied string ever becomes a path component" is a class fix. Say which yours is, and if it's an instance fix, say what the class fix would be.
Why this is weighted. Fewer than half of working developers can spot a security hole in code, and being shown vulnerabilities does not by itself teach you to find or close them. Exploiting is the half that feels like progress; defending is the half that transfers to your job.
Part 4 — Reflection
- Map your top finding to a CWE and to OWASP A06 (Insecure Design); explain the mapping in one sentence.
- Name one real-world breach caused by a design flaw (not a missing patch) and what design control would have prevented it.
- Of your five mitigations, which gives the most risk reduction per unit of effort, and why?
Grading rubric (100)
| Criterion | Points |
|---|---|
| Lecture questions (Part 2) | 20 |
| Exploitation + evidence (DFD + STRIDE table + EoP findings + screenshots) | 40 |
| Defense (top-5 ranking + mitigations) | 25 |
| Reflection (CWE/OWASP mapping + breach + best mitigation) | 15 |
Due: 23:59 (Thai time) the night before next week's class (exact time on learn.zcr.ai/submit). Late: −10% per started day; 0 after 10 days.
Assessed within the rows above (they are not extra points — they are what those points are for):
- Systems-level reasoning (inside Exploitation + evidence, Task 3b): does the model reach past single elements to boundaries, reachability and chains? Scored with the STRIDE + systems-thinking rubrics of Joshi et al. 2024.
- Defensive proof (inside Defense, Task 8): a claimed mitigation with no before/after evidence scores at most half. A mitigation you can show closing a class scores full.
- Adversarial thinking (across the whole sheet): do the abuse cases, personas and chains show you reasoning as an attacker with goals and constraints — or just listing categories? This is the course's central disposition and it is assessed, not assumed.
Evidence & Integrity (required)
- Identity proof: every screenshot/diagram must show a terminal running
printf '%s | %s | ' "$(whoami)" '<YOUR-STUDENT-ID>'; date '+%F %T %Z'(on Windows, in Git Bash or WSL) in the same image as the evidence. When the evidence is a browser page, a DevTools panel or a rendered response, put that terminal beside the browser and capture the whole screen — a cropped window carries nothing that identifies you, and the lab's own output is byte-identical for the whole cohort by design, so the stamp is the only thing that makes the shot yours. Generic or borrowed evidence is not accepted. - Personalized flag: N/A — this week has no arena challenge, so no flag is issued. Leave this blank.
- Explain in your own words (graded on your reasoning, not copied text):
- What did you do, and why did the vulnerability work?
- Why does your fix actually stop it — and what could still break it?
🤖 Audit the AI (required)
AI is a power tool you must distrust — you are graded on your critique, not the AI's answer.
- Ask an AI assistant to exploit or fix this week's vulnerability. Paste its full answer.
- Find what's wrong or risky in it — insecure code, a subtly incomplete fix, a hallucinated API/function/CVE, a missed edge case, or wrong reasoning. Quote the exact line(s).
- Produce the correct, verified version yourself and explain in 2–3 sentences why the AI's output was insufficient.
Disclose your AI use in the AI tools used column of the Part 1 table. This task counts toward your Defense + Reflection score.
🧠 Comprehension & Prompt (required)
A. Explain in Plain English (EiPE). In 2–3 sentences, in your own words, describe what this week's vulnerable code/endpoint actually does and why it is exploitable — explain the mechanism, don't dump jargon.
B. Prompt Problem. Write a single prompt that makes an AI produce a correct, secure fix for one finding. Run it: does the exploit now fail? If not, refine the prompt and try again. Submit the final prompt + the verified result. Graded on the prompt's precision and your verification — this trains problem decomposition and AI literacy (Denny et al. 2024).